
Sleeve donations are back! For the time being this is the only way to support us: Donate on Boosty.
MirrorsFull version · Google DriveImageless · Google DriveUse these only if MediaFire is down — the Drive links break under heavy traffic.
Warning: the Imageless version has no card images — they download on first launch. If you have an old version, copy the CardSprite and CardSpriteMini2 folders into it to shorten the download.
Advanced: Japanese card images — to keep them, turn off automatic image updates by setting GetImageUpdatesMode=1 in Setting.ini, otherwise the client will overwrite them.
First of all, please note that this game client is not fully automatic — you need to do most of the actions on your own. Some effects, like power-ups or ride chain effects, are automated, but that's it. You need to understand the game rules and learn the controls to actually play with this client.
Main menu
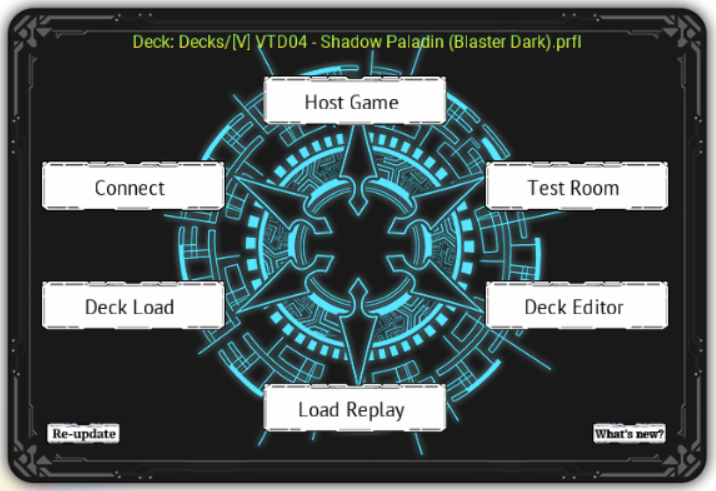
- Host. Create your own game room. Anyone who wants to join needs your IP address.
- Test. Test all the control keys or your deck. There is no opponent in this mode, and a bot opponent is not planned for the foreseeable future.
- Deck Editor. Create and update your decks.
- Load Replay. Watch replays. When you exit a fight, the client asks if you want to save one — replays go to the
replaysfolder inside your CFA folder. To watch someone else's replay, put the file there. You choose the playback speed when loading, and Enter pauses. There is no exit button, so restart the client after watching. - Deck Load. Load one of your decks. The loaded deck is shown at the top of the menu.
- Connect. Join our server (address and port below) or a game hosted by a friend — for that, enter their IP address.
- Re-update. Sync your CFA with the latest updates.
- What's new? Hover to see the latest features.
CFA server
Connect to78.107.248.143Port14800
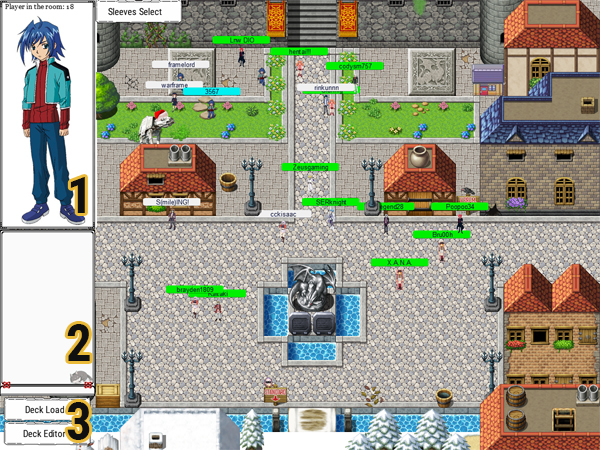
- Your character, plus how many players are in your current location. If someone challenges you, you'll see it above your head.
- Chat — seen by everyone in your location. Press Enter to open it and Enter again to send.
- Deck Load and Deck Editor buttons, same as in the main menu.
- Sleeve Select — buy sleeves or win them in the Ice Castle lottery.
What does the nickname colour mean?
- White — not playing or watching. Click to challenge them.
- Green — playing. Click their character to watch.
- Turquoise — watching someone else's game.
- Magenta — building a deck.
- Yellow — solo testing.
Locations
There are seven visible locations: start, V format, D (Standard) format, shop, docks, Ice Castle and Random Room.
- V format location. Only V format cards can be used here. If your loaded deck has older or newer cards, the client won't let you challenge anyone.
- D format location. Only Standard format cards.
- Random Room. Your deck is generated randomly; the first card of your loaded deck picks the clan.
- Ice Castle. Every 45 minutes anyone standing here gets a random sleeve from the current pool — two if at least 30 people are in the room.
There are also two secret rooms — find them on your own.
Deck Editor
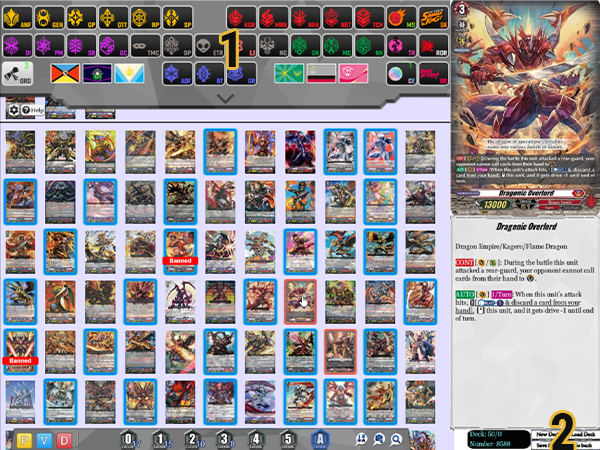
- List of all clans. Clicking a clan icon collapses this menu; click it again to open.
- Deck editing functions. Load and save your deck, create a new one or go back to the previous menu.
- Left-click a card to add it to your deck, right-click to remove it.
- To add a card to your ride deck, hold Ctrl and left-click it.
- Hit Enter or click the magnifying glass to search by card name and/or text. To cancel the search, open the prompt again and confirm it empty.
- Press S or click the camera icon to take a deck screenshot in HD or SD. The HD image can be too large to upload to Discord without a subscription.
- Cards are sorted by name by default. Click the down arrow with the A–Z letters to sort them by the date they were added to CFA, oldest first.
- Buttons 0–5 filter cards by grade. The number in the blue outline next to each shows how many cards of that grade are in your deck.
- Filter by format with the yellow P (Premium only), blue V (V only) or red D (Standard only) icon; A resets both the format and the grade filters.
- V format cards have a blue frame, D format cards a red one.
Playing area
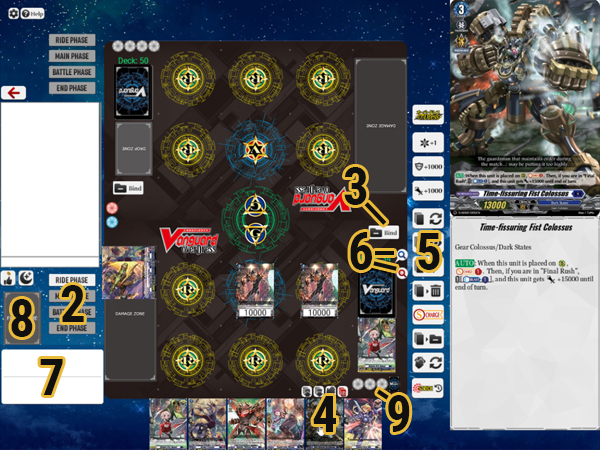
- Game chat. Hit Enter or click it to start typing, Enter again to send. Ctrl+V pastes, the arrow keys move the cursor. The chat also announces some effects, like looking at the top of a deck or drawing from the bottom, and warns at the start of the game if someone uses an illegal number of triggers or sentinels.
- Turn phases. Yours are below the chat, your opponent's above it. Ride Phase stands all your units. End Phase removes extra power and crits and returns your G units to the G Zone face up. If your opponent is in their Battle Phase and you are not, you do Damage Checks instead of Drive Checks.
- Bind zone. Left-click it to bind the selected card — face down by default, or face up with Shift held. Right-click it to open the zone, then right-click cards inside to flip them.
- Card control menu. Click your card to see its actions above it: send it to the top or bottom of the deck, add it to your hand or send it to the G Zone. Cards in the deck can Legion, and Arms cards in the hand or deck can be Armed.
- Menu. Shuffle your deck, add gauge to a unit or use Cradle, mill the top card, Soul Charge, bind the top card, reveal or look at the top of your deck, shuffle your hand and return your G unit from the Vanguard circle to the G Zone. It also changes a unit's critical, shield and power, and performs overDress.
- Deck circles. The red circle opens your G deck, the blue one your main deck.
- G Zone quick view. Face-up cards in the G Zone: yours at the bottom, your opponent's at the top.
- RFG zone. Cards removed from play. The zone is shared by both players.
- Ride deck. Four extra slots. Ctrl+click cards in the Deck Editor to add them to your ride deck, and they'll be moved here automatically at the start of the game.
Control keys
Mouse
- Left click any card except your Vanguard — select it. Clicking your opponent's card highlights it for them.
- Alt + left click your card — highlight an effect activation.
- Left click your deck — draw a card. Shift + left click — draw the bottom card.
- Right click your deck — Drive Check. If your opponent is in their Battle Phase and you are not, it's a Damage Check instead.
- Wheel click your deck — look at the top cards.
- Ctrl + left click your deck — open it. While it's open, your opponent sees your deck in green with the number of cards you're looking at.
- Ctrl + left click your or your opponent's Vanguard — open the soul.
- Right click your drop zone — open it.
- Right click your Vanguard or a rear-guard — change its position.
- Right click a card in your Damage or Bind Zone — flip it.
- Ctrl + left click your rear-guard — lock or unlock it.
- Wheel click a unit, or hover it and press Space — increase or decrease its power.
Keyboard
- Delete with the cursor over your Vanguard — delete your Vanguard.
- Alt+Enter or F4 — toggle fullscreen.
- Ctrl+Q — open the game log, or just Q while the chat is closed.
- Ctrl+Shift+S — save the log during a game.
- S — save a deck screenshot in the Deck Editor.
- Enter — type a chat message, Enter again to send it. Ctrl+V pastes into the chat.
- Ctrl+C — copy the name of the card shown on the right; Ctrl+Shift+C copies its ID.
- Ctrl or Esc — close your deck, soul or drop zone.
4.25c Changelog
New features
- Swap button for units on RC: exchanges positions within the same column and replaces "To G Zone" when applicable. You can also drag a selected unit onto an occupied RC. Doesn't work if both units have originalDress under them.
- Infinity Lense marker.
- The opponent's damage and GC cards can be highlighted.
- Deck Editor alternates the art of dual-world Buddyfight cards and of cards that are both "Banned" and "Restricted".
- New intro screen.
- Player status only shows when you set it directly (a default one, if set, still shows on hover).
Bug fixes
- Fixed lag gradually building up on the overworld map.
- Searching "Reverse", "Re-birth" and "Flamme" in the Deck Editor now finds names with special characters.
- Chat from the previous fight no longer shows up in a new one.
- Adding 1 power no longer creates decimal power values.
- Fixed the G Zone preview being off by one.
- The Legion button can be selected for units in drop.
- Opponent gauges are applied to the right RC.
- Adjusted rested positions of Legion pairs.
- Your custom player status is applied on login, no need to set it again.
- New autoupdater build with a fallback for the GitHub Version file errors some players were getting.
Custom card files
The client now uses UTF-8, but custom text files still use Win-1251. If your custom text files show random characters because you converted them to UTF-8, add this line to the bottom of Custom Overrides.txt: global.CustomFactionUTF8 = 1
We no longer publish a list of new cards on this page — sort the cards by date added in the Deck Editor instead. See also: previous Cardfight!! Area patch notes.